Introduction
Converting an oil lamp into an electric fixture can be a rewarding project, offering the charm and character of a classic piece with the convenience of modern technology. This guide will take you through the essential steps to safely and effectively electrify your oil lamp.
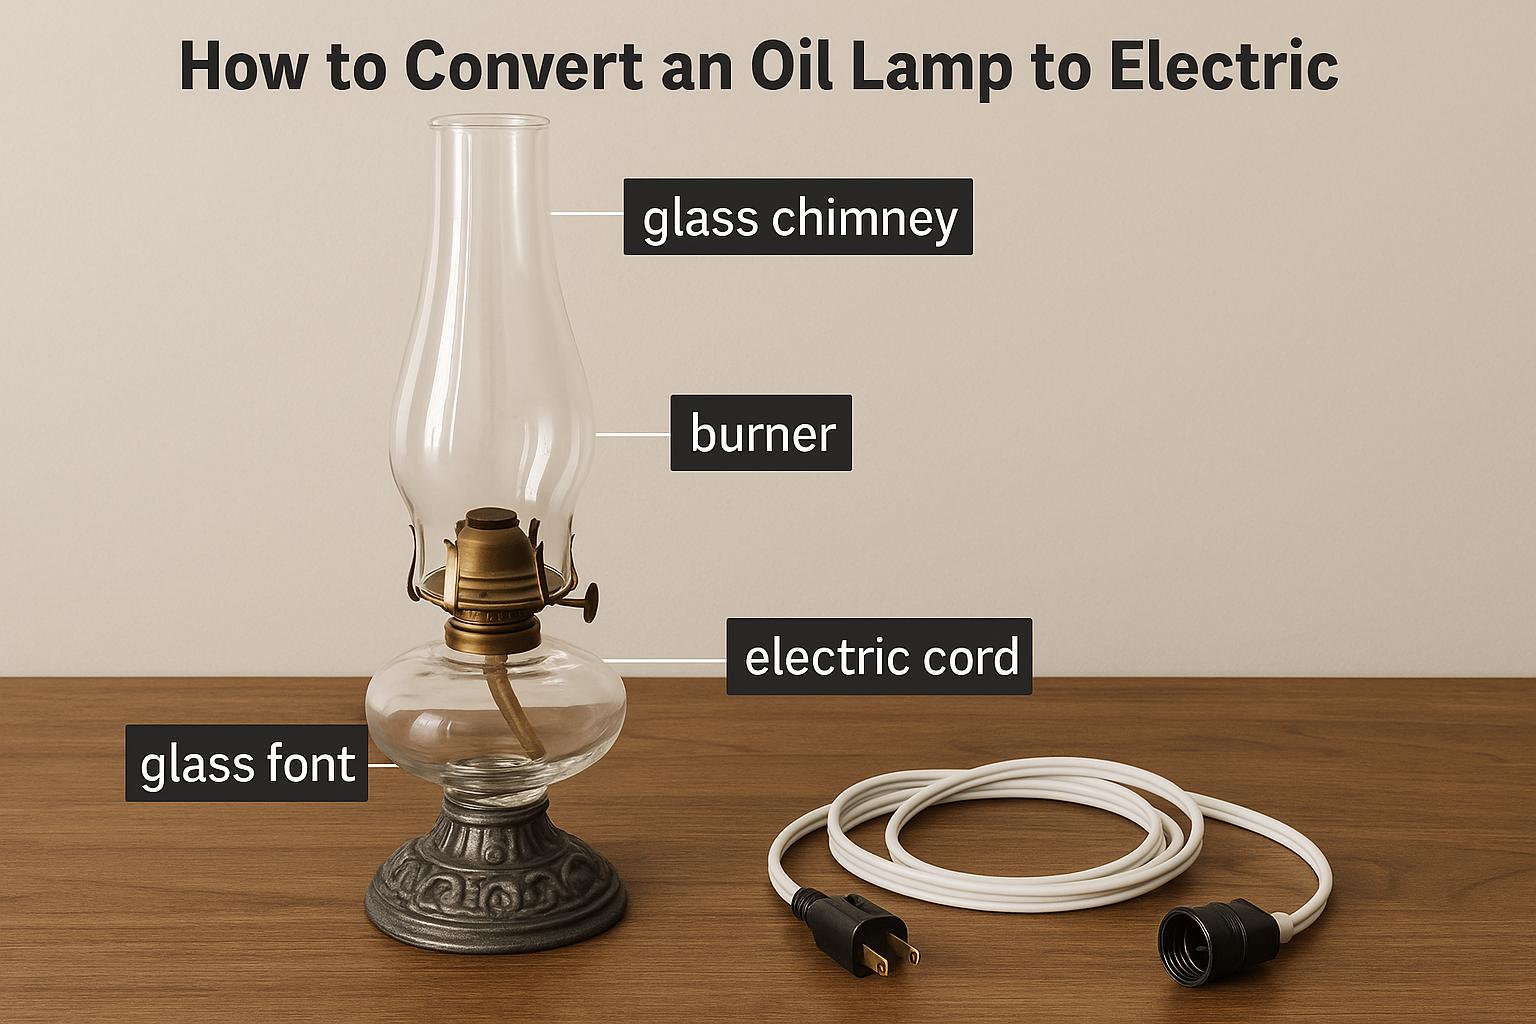
Materials and Tools Required
To begin the conversion, gather the necessary materials and tools:
Materials:
– Lamp kit (including the socket, cord, switch, etc.)
– Light bulb (ensure it fits the socket)
Tools:
– Screwdriver
– Drill with appropriate bits
– Wire cutter/stripper
– Pliers
Initial Preparation
Before starting, ensure the oil lamp is clean and free of oil. Disassemble any removable parts to access the base easier. Removing the oil container will ensure safety and make the drilling process more straightforward.
Starting with a clean and sturdy lamp base helps ensure that the work proceeds smoothly without complications. A well-maintained lamp will also make it easier to work without damaging any delicate parts. Additionally, any dirt or residue left on the surface may mar the appearance after your electrical conversion.
Drilling Holes for the Cord
To allow the electric cord to pass through the lamp:
1. Locate a Suitable Area: Identify where to drill—preferably the base—to not affect the lamp’s aesthetics.
Selecting the right place on the lamp base to drill is crucial. A discreet location ensures that the newly added electrical components do not detract from the lamp’s original visual appeal. When considering placement, be sure to also account for the lamp’s stability post-conversion.
2. Drill Carefully: Using an appropriate drill bit, create a hole. Ensure the hole is wide enough for the cord but not too large to maintain stability.
When drilling, work slowly and steadily to avoid cracking or chipping the lamp’s surface. Use a clamp or a partner to securely hold the lamp if necessary. This stability allows for greater precision and helps maintain the integrity of the lamp.
Wiring the Lamp
1. Attach the Socket: Connect the socket from your lamp kit where the wick would usually be. Secure it firmly to prevent any movement.
The socket is essential for safely housing the light bulb, so it must be tightly secured in place. Consult your lamp kit’s instructions for any specific nuances related to the socket attachment process.
2. Thread the Cord: Feed the cord through the hole drilled in the base. Allow enough slack to reach the socket comfortably.
Ensure that the cord does not kink or bend sharply, as this can lead to issues later on. The cord should move freely through the base to prevent tension that might damage the electrical connections.
3. Connect the Wires: Strip about one inch of insulation from the cord’s ends and attach them to the socket’s terminals. Ensure a snug fit by properly tightening any screws.
The connection between the wires and the socket is paramount to safety and functionality. Check that the wires are correctly seated and securely fastened within the socket terminals. Wobbling or loose wires could be a hazard and lead to malfunctions.
4. Install the Switch: If your kit includes a switch, follow the manufacturer’s instructions for installing it along the cord. This often requires cutting the cord and connecting it to the switch terminals.
Adding a switch gives you easy control over the lamp and often enhances usability. When installing the switch, ensure that it is easily accessible for everyday use. Consider the length of the cord and its location when deciding where to place the switch.
Assembling and Testing
Reassemble any parts of the lamp you removed during preparation:
1. Return any decorative components to their original position.
This step reinstates the lamp’s original beauty and visual coherence. Take care to reattach any pieces gently, avoiding disruption to the new wiring system.
2. Insert a light bulb that matches the socket size and type specified by the lamp kit.
Not only does using the correct bulb ensure proper fit and function, but it can also prevent potential accidents or breakage.
Testing: Plug your newly electrified lamp into a power source and switch it on. Ensure the light operates correctly without flickering or disrupting the power. If issues arise, revise your connections to confirm they are secure and correctly positioned.
Testing your lamp before finalizing your project is a crucial step. In addition to checking for flickering light, be sure to listen for any unusual sounds such as buzzing, which might indicate improper connections. Repeat any steps necessary to correct any detected issues.
Conclusion
Converting an oil lamp to electric can enhance its functionality while preserving its historical charm. Following these methodical steps can help ensure a safe and efficient conversion process. However, safety should remain a top priority throughout. Always consult a professional electrician if you experience any uncertainties or complications during the project.
An electrical conversion does not reduce the historical value of an oil lamp if done thoughtfully. Instead, it highlights the blend between tradition and technology, letting you maintain the lamp’s charm while enjoying its newfound practicality. As you embark on this endeavor, keep in mind that functional modifications can coexist harmoniously with aesthetic preservation.